Remember the first time you cracked open a perfect avocado? That creamy, buttery texture that made your morning toast sing? Now imagine walking out to your patio and picking that same perfect avocado from your very own tree. It sounds like a dream, but I’m here to tell you it’s absolutely achievable – even if you live in Minnesota or Maine.
After years of helping fellow gardeners turn their black thumbs green, I’ve discovered that growing avocados in containers isn’t just possible; it’s one of the most rewarding gardening adventures you can embark on. Yes, it takes patience (we’re talking about a 3-4 year journey to fruit), but the satisfaction of serving homegrown guacamole at your next family gathering? Priceless.
With avocado prices hitting $2-3 each at the grocery store, a productive avocado tree can save you hundreds of dollars annually while providing the freshest, most flavorful fruit you’ve ever tasted. Let’s dive into everything you need to know to turn that pit from last night’s dinner into your future favorite plant.
Why Container Growing is Your Secret Weapon
Before we jump into the how-to, let’s talk about why growing avocados in pots might actually be better than planting them in the ground – even if you live in sunny California or Florida.
Container growing gives you complete control over your avocado’s environment. You can move it to catch the perfect morning sun, shelter it from harsh afternoon heat, and bring it indoors when Old Man Winter comes knocking. Plus, you’ll never have to worry about your tree outgrowing its space or dropping fruit on your neighbor’s prized roses.
For those of us in northern climates, containers are the only way to make avocado growing work. But even in warmer zones, many experienced gardeners prefer the flexibility and control that comes with pot cultivation.
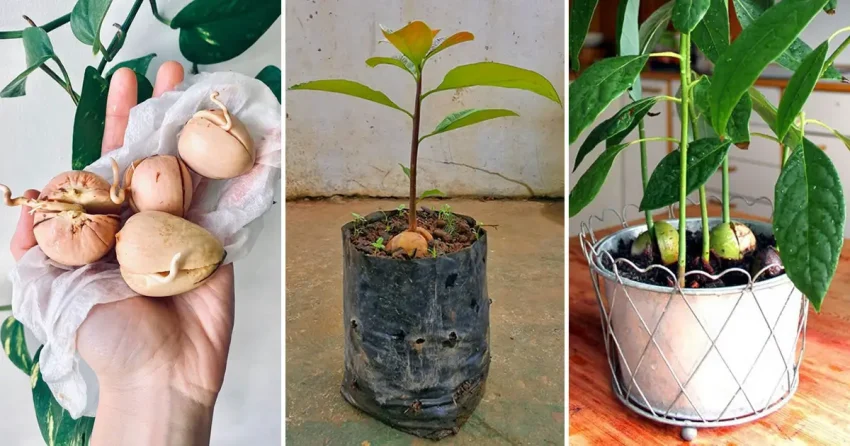
Starting Your Avocado Journey: The Art of Germination
The Classic Toothpick Method That Actually Works
We’ve all seen the Pinterest photos of avocado pits suspended over glasses of water with toothpicks. While it looks simple, there’s a right way and several wrong ways to do this.
Start with a fresh, undamaged pit from a ripe avocado. Gently wash off all the flesh – and I mean all of it. Any remaining fruit will rot and contaminate your water, leading to a smelly, unsuccessful germination attempt.
Here’s the key most people miss: identify the pointed end (top) and the broader, flatter end (bottom). The bottom is where your roots will emerge, so it needs to be submerged about halfway in water. Pierce the pit horizontally with four toothpicks, spacing them evenly around the middle.
Place your suspended pit in a warm, bright location but out of direct sunlight. A kitchen windowsill that gets morning light is perfect. Change the water every 3-4 days – this isn’t optional. Stagnant water breeds bacteria that will kill your sprouting efforts.
Timeline Expectations for Real Results
Don’t expect overnight success. Avocado germination is like good wine – it takes time to develop properly. In optimal conditions (75-80°F), you might see roots in 2-4 weeks. In cooler conditions, it could take 6-8 weeks.
I’ve had students give up after three weeks, only to have their pit sprout the very next day. Patience is your best gardening tool here.
Alternative Germination Methods for Better Success
If the toothpick method feels too fussy, try the paper towel technique. Wrap your clean pit in damp paper towels, place it in a plastic bag with a few air holes, and keep it in a warm, dark place. Check weekly and keep the towels moist. This method often produces faster, more reliable results.
Choosing the Right Varieties for Container Success
Not all avocado varieties are created equal when it comes to container growing. Here are your best bets for success:
Dwarf and Semi-Dwarf Varieties
‘Wurtz’ (Little Cado): This is the gold standard for container growing. It stays compact (6-8 feet in a pot) and produces medium-sized, high-quality fruit. Perfect for patios and small spaces.
‘Holiday’: Another excellent choice that fruits reliably in containers and handles temperature fluctuations well.
‘Gwen’: Stays relatively small and produces large, creamy fruit similar to Hass avocados.
Standard Varieties That Adapt Well
‘Hass’: While it can get large, aggressive pruning keeps it manageable in containers. The fruit quality is exceptional – it’s the variety you buy at the store.
‘Fuerte’: Cold-hardy and adaptable, though it may need a larger container as it matures.
The Perfect Pot: Size, Material, and Setup
Container Sizing Through the Years
Your avocado’s pot needs will change as it grows. Start your newly sprouted seedling in a 6-8 inch pot, then gradually move up sizes:
- Year 1: 6-8 inch pot
- Year 2: 12-15 inch pot
- Year 3-4: 20-24 inch pot
- Mature tree: 30+ inch pot or half-barrel
Don’t jump straight to a huge pot – oversized containers hold too much moisture and can lead to root rot.
Material Matters for Long-Term Success
Terracotta and Clay: Excellent drainage and breathability, but heavy and can crack in freezing weather. Perfect for southern gardeners who won’t need to move their trees often.
Plastic: Lightweight and affordable, but can get too hot in direct sun and doesn’t breathe well. Choose light-colored options to prevent root overheating.
Wooden Half-Barrels: My personal favorite for mature trees. They’re attractive, provide excellent insulation, and hold up well to weather changes. Line with plastic to extend their life.
Fabric Pots: Great for root health due to air pruning, but they dry out quickly and may not be stable enough for larger trees.
Drainage: The Make-or-Break Factor
Avocados are extremely sensitive to waterlogged conditions. Your pot must have multiple drainage holes – not just one in the center. If your chosen container doesn’t have adequate drainage, drill additional holes yourself.
Place a layer of coarse gravel or pottery shards in the bottom before adding soil. This creates a drainage reservoir and prevents soil from blocking the holes.
Soil: Creating the Perfect Growing Medium
The pH Sweet Spot
Avocados thrive in slightly acidic soil with a pH between 5.5 and 7.0. Most commercial potting mixes are too alkaline, so you’ll need to make adjustments.
DIY Potting Mix Recipe for Success
Here’s my proven recipe for avocado container soil:
- 40% high-quality potting mix (I like Miracle-Gro Potting Mix as a base)
- 20% peat moss or coconut coir
- 20% compost or worm castings
- 10% perlite for drainage
- 10% coarse bark chips for structure
Mix in a slow-release fertilizer designed for citrus trees – avocados have similar nutritional needs.
Testing and Adjusting Your Soil
Invest in a simple soil pH test kit from your local garden center. If your mix tests above 7.0, add more peat moss or a bit of sulfur to lower the pH. If it’s too acidic (below 5.5), add a small amount of lime.
Climate Considerations Across America
Northern States (Zones 3-6): Indoor/Outdoor Strategy
If you live in areas where winter temperatures regularly drop below 32°F, plan for a mobile setup. Use containers with wheels or plant caddies to make moving easier.
Winter Care: Move plants indoors when nighttime temperatures consistently hit 45°F. Place near your brightest south-facing window, or supplement with grow lights.
Summer Strategy: Gradually acclimate your tree to outdoor conditions in late spring. Start with a few hours of morning sun and gradually increase exposure.
Middle States (Zones 7-8): The Goldilocks Zone
You have the best of both worlds – mild enough winters that your tree might survive outdoors with protection, but you can easily bring it inside during the coldest weeks.
Protection Methods: Wrap containers in insulating materials like bubble wrap or burlap. Create microclimates against south-facing walls where temperatures stay 5-10 degrees warmer.
Southern States (Zones 9-11): Year-Round Growing
Lucky you! Your main challenges will be intense summer heat and humidity rather than cold protection.
Heat Management: Provide afternoon shade during the hottest months. Use shade cloth (30-50% shade) or position containers where they get morning sun but afternoon protection.
Seasonal Care Calendar for Maximum Success
Spring (March-May): Growth Season Begins
This is your tree’s wake-up call. If you brought it indoors for winter, start the transition process in early spring.
Tasks:
- Gradually increase watering as growth resumes
- Apply slow-release fertilizer
- Begin monthly liquid fertilizing schedule
- Repot if rootbound
- Start weekly growth monitoring
Summer (June-August): Peak Growing Season
Your avocado will put on its major growth during these warm months. This is when you’ll see the most dramatic changes.
Tasks:
- Water deeply but allow soil to dry between waterings
- Continue monthly fertilizing
- Prune for shape and size control
- Monitor for pests (more active in warm weather)
- Provide afternoon shade in extreme heat
Fall (September-November): Preparation Mode
As temperatures cool, your tree will slow its growth and prepare for dormancy.
Tasks:
- Reduce watering frequency
- Stop fertilizing by late September
- Begin cold protection preparations
- Harvest any ripe fruit
- Plan winter location for northern gardeners
Winter (December-February): Rest Period
Even in warm climates, avocados slow down significantly in winter. This is maintenance mode.
Tasks:
- Water sparingly – only when soil is quite dry
- No fertilizing during dormancy
- Monitor for cold damage
- Plan next year’s growing strategy
Watering Wisdom: Getting It Just Right
The Finger Test Method
Stick your finger 2-3 inches into the soil. If it’s dry at that depth, it’s time to water. If it’s still moist, wait another day or two.
Deep and Infrequent vs. Light and Often
Always choose deep, thorough watering over frequent light sprinkles. Water until you see it running out the drainage holes, then don’t water again until the soil begins to dry out.
Seasonal Watering Adjustments
- Spring/Summer: Water every 2-3 days in hot weather
- Fall: Water every 4-5 days
- Winter: Water every 7-10 days, sometimes less
Signs of Watering Problems
Overwatering: Yellow leaves, musty soil smell, fungal growth, leaf drop Underwatering: Brown leaf tips, wilting, dry soil pulling away from pot edges
Fertilizing for Fruit Production
Understanding Avocado Nutrition Needs
Avocados are heavy feeders, especially of nitrogen, potassium, and zinc. They also need adequate iron, magnesium, and manganese for healthy growth.
Fertilizing Schedule That Works
Spring Boost (March): Apply a balanced slow-release fertilizer (10-10-10 or similar)
Growing Season (April-September): Monthly applications of liquid fertilizer designed for citrus or avocados
Fall Preparation (October): One final feeding with low-nitrogen, high-potassium fertilizer
Winter Rest (November-February): No fertilizing
Organic vs. Synthetic Options
Organic Choices: Compost, worm castings, fish emulsion, kelp meal Synthetic Options: Miracle-Gro Citrus Food, Jobe’s Fruit & Citrus Spikes
Both work well – choose based on your gardening philosophy and budget.
Micronutrient Management
Avocados often show zinc and iron deficiencies. Look for fertilizers that include these micronutrients, or apply them separately using chelated forms for better absorption.
Pruning: Shaping Your Future Harvest
When to Prune for Best Results
The best time to prune is late winter or early spring, just before new growth begins. Avoid pruning during fruit development or in extreme weather.
The First-Year Pinching Strategy
When your seedling reaches 12 inches tall, pinch out the growing tip. This forces the plant to branch, creating a bushier, more productive tree structure.
Annual Pruning for Size Control
Each year, remove:
- Dead, diseased, or damaged branches
- Branches growing toward the center
- Excessive vertical growth (suckers)
- Lower branches touching the soil
Pruning for Fruit Production
Once your tree begins flowering (usually year 3-4), careful pruning becomes even more important:
- Maintain an open center for air circulation
- Keep the tree height manageable for harvesting
- Remove competing branches to direct energy to fruit development
Troubleshooting Common Problems
Leaf Problems and Solutions
Brown Leaf Tips: Usually indicates underwatering, low humidity, or salt buildup from fertilizer. Increase watering frequency and flush soil monthly with plain water.
Yellow Leaves: Can indicate overwatering, nutrient deficiency, or natural aging. Check soil moisture and adjust watering schedule.
Leaf Drop: Common when moving plants between locations or during stress. Usually temporary if growing conditions improve.
Root Issues and Recovery
Root Rot: The #1 killer of container avocados. Prevention is key – ensure excellent drainage and avoid overwatering. If caught early, repot in fresh, well-draining soil and trim affected roots.
Rootbound Plants: When roots circle the pot bottom, it’s time to move up a size. Gently tease apart circled roots before repotting.
Pest Management for Healthy Trees
Scale Insects: Small, brown bumps on stems and leaves. Remove by hand or use horticultural oil spray.
Spider Mites: Tiny pests that cause stippled leaves. Increase humidity and use insecticidal soap.
Aphids: Small, soft-bodied insects that cluster on new growth. Spray off with water or use neem oil.
Pollination: The Key to Fruit Production
Understanding Avocado Flower Behavior
Avocados have unique flowering behavior. Each flower opens twice – once as a female (receptive to pollen) and once as a male (producing pollen). The timing varies by variety, which affects self-pollination success.
Hand Pollination for Container Trees
Since you may only have one tree, hand pollination can improve fruit set:
- Use a small paintbrush to collect pollen from male-phase flowers
- Transfer to female-phase flowers on the same or different branches
- Best success occurs in morning hours when flowers are most receptive
Encouraging Natural Pollinators
Even on patios, you can attract beneficial insects:
- Plant flowering herbs nearby (basil, oregano, thyme)
- Provide shallow water sources
- Avoid pesticide use during flowering season
Regional Growing Tips for Success
Pacific Northwest (Oregon, Washington)
Your mild, wet climate can work for avocados with proper variety selection and protection:
- Choose cold-hardy varieties like ‘Fuerte’ or ‘Bacon’
- Provide excellent drainage to prevent root rot
- Use season extenders like cold frames or greenhouse space
Southwest Desert (Arizona, Nevada, New Mexico)
Extreme heat and dry conditions require special strategies:
- Provide afternoon shade and wind protection
- Water deeply and frequently during summer
- Use light-colored containers to prevent root overheating
- Consider evaporative cooling around plants
Humid Southeast (Florida, Georgia, Louisiana)
High humidity can encourage fungal problems:
- Ensure excellent air circulation around plants
- Water at soil level rather than overhead
- Monitor closely for pest problems
- Choose varieties suited to humid conditions
California Coast
Your Mediterranean climate is ideal for avocados:
- Take advantage of year-round growing potential
- Watch for salt damage if near the ocean
- Use your extended growing season for maximum fruit production
Companion Planting and Design Ideas
Herbs That Complement Avocados
Plant aromatic herbs around your avocado containers:
- Basil: Repels insects and provides culinary benefits
- Rosemary: Drought-tolerant and deer-resistant
- Oregano: Attracts beneficial insects when flowering
- Thyme: Low-maintenance ground cover option
Creating an Edible Container Garden
Build a complete patio ecosystem:
- Citrus trees for year-round interest
- Berry bushes for quick fruit production
- Vegetable containers for fresh ingredients
- Herb spirals for maximum variety in small spaces
Aesthetic Considerations
Your avocado tree can be a landscape focal point:
- Choose decorative containers that match your style
- Underplant with colorful annuals or trailing plants
- Use as a backdrop for smaller flowering plants
- Create height variation with plant stands or risers
Long-Term Success Strategies
Planning for Growth
Your cute little seedling will eventually become a substantial tree. Plan ahead:
- Choose your final container location carefully
- Consider weight limitations for balconies or decks
- Plan access routes for moving large containers
- Budget for larger containers and more soil over time
Variety Selection for Continuous Harvest
Once you’ve mastered one tree, consider adding varieties with different harvest seasons:
- Early Season: ‘Bacon,’ ‘Fuerte’ (fall harvest)
- Mid Season: ‘Hass,’ ‘Pinkerton’ (winter/spring harvest)
- Late Season: ‘Lamb Hass,’ ‘Sir Prize’ (summer harvest)
Building Your Avocado Knowledge
Join local gardening groups and online communities:
- University extension programs often offer fruit tree courses
- Online forums provide real-time problem-solving help
- Local nurseries may offer specialized varieties and advice
- Garden clubs connect you with experienced growers
Budget-Friendly Tips for Fixed Incomes
Starting Costs and Money-Saving Strategies
Growing avocados doesn’t have to break the bank:
- Start with seeds from grocery store avocados (free!)
- Look for end-of-season sales on containers
- Make your own potting mix to save 50% on soil costs
- Share bulk fertilizer purchases with gardening friends
Long-Term Savings
A productive avocado tree can save you $200-400 annually on grocery bills. With proper care, your tree can produce for decades, making it one of the best investments in your food budget.
Repurposing and Recycling
- Use large yogurt containers for seedling pots
- Repurpose old buckets and storage containers (add drainage holes)
- Compost kitchen scraps for free fertilizer
- Save rainwater for irrigation
Seasonal Maintenance Checklist
Spring Startup (March-April)
- Transition indoor plants to outdoor conditions
- Apply slow-release fertilizer
- Check for winter damage and prune if needed
- Repot rootbound plants
- Begin regular watering schedule
Summer Care (May-August)
- Deep water 2-3 times weekly
- Monthly liquid fertilizing
- Monitor for pests and diseases
- Provide shade during heat waves
- Prune for shape and size control
Fall Preparation (September-November)
- Reduce watering frequency
- Stop fertilizing by late September
- Harvest ripe fruit
- Plan winter protection strategy
- Clean up fallen leaves
Winter Protection (December-February)
- Move containers to protected locations
- Water sparingly
- Monitor for cold damage
- Plan next year’s growing strategy
- Order new varieties for spring planting
Your Path to Homegrown Avocado Success
Growing avocados in containers isn’t just about the fruit – though that first homegrown guacamole will be a moment you’ll never forget. It’s about connecting with your food, creating something beautiful and productive, and proving to yourself that you can nurture life from a simple seed to a fruitful tree.
The journey takes patience. Your first year will be about establishing strong roots and healthy growth. Year two brings more substantial size and the first hints of your tree’s mature character. By year three or four, you might see your first flowers, and with them, the promise of homegrown fruit.
But here’s what I’ve learned after years of helping gardeners succeed with container avocados: the waiting isn’t just worth it – it’s part of the joy. Every new leaf, every inch of growth, every successful transition through the seasons builds your confidence and connection with your tree.
Start today. That avocado you’re about to eat? Save the pit. Clean it carefully, set it up with toothpicks and water, and place it in your brightest window. In a few weeks, you’ll see that first crack in the seed, and you’ll know you’re on your way to joining the ranks of proud avocado growers.
Remember, every expert was once a beginner. Every successful avocado tree started as a single seed someone decided to nurture. Your patience, attention, and care will be rewarded with years of fresh, homegrown fruit and the satisfaction of knowing you grew it yourself.
The best time to plant an avocado tree was twenty years ago. The second-best time is today. What are you waiting for?
Ready to start your avocado growing adventure? Share your progress in the comments below – I’d love to hear about your successes, challenges, and questions. And if this guide helped you, pass it along to a friend who might enjoy growing their own avocados too. Happy growing!