Do you remember your grandmother’s front porch, overflowing with cascading petunias that seemed to bloom endlessly through the hottest summer days? Or perhaps you recall those perfect suburban neighborhoods where every hanging basket and window box burst with vibrant trumpet-shaped flowers that never seemed to quit? There was something magical about those displays – and I’m here to tell you that same magic is absolutely achievable in your own garden today.
The secret isn’t expensive fertilizers, fancy varieties, or even a green thumb passed down through generations. It’s something much simpler: a gardening technique called deadheading that takes just minutes but delivers months of spectacular blooms. If you’ve ever watched your petunias start strong in May only to fizzle out by July, or wondered why your neighbor’s containers look magazine-perfect while yours seem tired and leggy, you’re about to discover the game-changing technique that separates thriving gardens from disappointing ones.
Whether you’re working with a tight retirement budget, managing containers on a small patio, or trying to create that picture-perfect curb appeal that makes the whole neighborhood stop and stare, mastering petunia deadheading will transform your summer gardening success. Let’s dive into this simple but powerful technique that’ll have you enjoying continuous color from Memorial Day straight through to the first frost.
Why Every American Gardener Needs to Master Petunia Deadheading
Petunias have been America’s sweetheart summer flower for good reason. They’re affordable, adaptable to our diverse climate zones, and incredibly generous with their blooms – when you know how to keep them going. But here’s what many gardeners don’t realize: without proper deadheading, even the most expensive petunia varieties will disappoint you by midsummer.
Think of deadheading as your petunia’s personal trainer. Just like we need motivation to keep pushing toward our goals, petunias need that gentle nudge to continue producing the stunning displays we fell in love with at the garden center. When left to their own devices, these hardworking plants naturally shift their energy from flower production to seed formation – it’s basic plant biology. But with a few strategic snips, you redirect that energy back into what you really want: more gorgeous blooms.
The financial benefits alone make deadheading worth your time. A $3.99 flat of petunias from Home Depot or Lowe’s, properly deadheaded, will outperform expensive designer varieties that are neglected. I’ve seen gardeners spend $50 on premium hanging baskets only to watch them decline by July, while their neighbors enjoy spectacular displays all season long from basic grocery store plants – all because they understood this simple maintenance technique.
For those managing household budgets carefully, this knowledge is pure gold. Instead of replacing tired-looking containers mid-season (something garden centers actually count on), you’ll enjoy continuous beauty from your original investment. That’s money back in your pocket for other priorities.
Understanding Your Petunias: What’s Really Happening Inside Those Blooms
Before we dive into the how-to details, let’s understand what’s happening inside your petunia plants. This knowledge will make you a more confident and successful gardener, helping you make decisions that keep your flowers looking their absolute best.
The Plant’s Natural Life Cycle: From Bloom to Seed
Every petunia flower follows a predictable pattern that’s been hardwired into the plant for millions of years. First comes the beautiful bloom that catches our eye and attracts pollinators. As the flower ages, it begins to fade and eventually forms a seed pod – a small, green structure that develops right behind where the petals were attached.
Here’s the crucial part: once that seed pod forms, the plant considers its job done for that particular flower stem. It stops sending energy to produce new buds and instead focuses on developing those seeds. In nature, this makes perfect sense – the plant’s ultimate goal is reproduction and survival. But in our gardens, we want continuous blooms, not seeds.
When you remove spent flowers before they can form mature seed pods, you’re essentially telling the plant, “Not so fast! Keep those flowers coming!” The plant responds by redirecting its energy into producing new buds instead of developing seeds. This simple intervention can extend your blooming season by months.
Recognizing the Signs: When Flowers Need Your Attention
Learning to read your petunias like a book is a skill that develops quickly with practice. Fresh blooms have vibrant colors, smooth petals, and a slightly waxy feel. As flowers age, you’ll notice several telltale signs that it’s time to take action.
The petals begin to lose their crisp appearance, often developing a papery texture or becoming slightly translucent. Colors may fade or develop brown edges. In humid climates, spent flowers can become slimy or develop gray mold – a sure sign they need immediate removal.
Perhaps most importantly, you’ll start to see small, green, oval-shaped structures forming behind fading flowers. These are the developing seed pods, and their appearance is your cue that deadheading is urgently needed. Don’t wait until flowers are completely brown and crispy – by then, the plant has already started shifting its energy toward seed production.
Regional Growing Strategies: Tailoring Your Approach to American Climate Zones
America’s diverse climate zones present unique opportunities and challenges for petunia growing. Understanding your specific region helps you time your deadheading efforts and adjust your care routine for maximum success.
Northern States (USDA Zones 3-6): Making the Most of Shorter Seasons
If you’re gardening in states like Minnesota, Wisconsin, Michigan, or northern New York, your petunia season typically runs from late May through early October. The cooler nighttime temperatures in these regions actually help petunias maintain better flower quality, but the shorter growing season makes proper deadheading even more critical.
Start your petunias indoors 6-8 weeks before your last frost date, or purchase transplants after soil has warmed to at least 60°F. In northern climates, petunias benefit from morning sun and afternoon protection during the hottest part of summer, which can stress these cool-weather lovers.
Deadheading frequency in northern regions typically peaks during July and August when plants are most vigorous. You might find yourself deadheading every 3-4 days during peak growing season. Take advantage of cooler morning temperatures for this task – both you and your plants will appreciate avoiding the midday heat.
Consider companion planting with cool-season annuals like sweet alyssum or lobelia, which continue blooming even when temperatures drop in late summer. This extends your container displays well into fall, maximizing your investment.
Southern States (USDA Zones 8-10): Managing Heat and Humidity
Gardening with petunias in the South requires different strategies. States like Florida, Georgia, Texas, and Louisiana present challenges with intense heat and high humidity that can stress petunias by midsummer. However, your extended growing season allows for multiple petunia crops throughout the year.
In these regions, treat petunias as cool-season annuals, planting them in fall for winter and spring blooms, then again in late summer for fall displays. The intense summer heat (anything consistently over 85°F) causes most petunia varieties to struggle, making deadheading even more important to maintain plant energy during stress periods.
Morning deadheading is essential in humid climates to prevent fungal diseases that thrive on wet, decaying plant material. Remove spent flowers as soon as you notice them beginning to fade – don’t wait for the typical northern timeline. The combination of heat and humidity can turn yesterday’s beautiful bloom into today’s disease problem.
Wave petunias and other heat-tolerant varieties perform better in Southern climates, but even these improved types benefit from regular deadheading. Consider providing afternoon shade during the hottest months, and maintain consistent moisture without waterlogging.
Western States: Dealing with Dry Air and Intense Sun
The Mountain West and Southwest present unique growing conditions with intense UV radiation, low humidity, and dramatic temperature swings between day and night. States like Colorado, Arizona, Nevada, and Utah require adapted growing strategies for petunia success.
The dry air in these regions actually helps prevent many fungal diseases that plague petunias in humid climates, but the intense sun can bleach flower colors and stress plants. Choose locations with morning sun and afternoon protection, especially during summer months.
Deadheading frequency may be higher in these regions due to accelerated flower aging from intense UV exposure. However, the low humidity means you can be less concerned about immediate removal of every spent bloom – there’s less disease pressure than in humid climates.
Container growing is particularly popular in desert regions, allowing you to move plants to optimal locations and providing better control over soil moisture. Use light-colored containers to prevent root overheating, and consider double-potting for additional insulation.
Midwest and Great Plains: Working with Weather Extremes
The heartland presents challenges with variable weather patterns, from late spring freezes to summer drought, sudden storms to early fall frosts. States like Kansas, Nebraska, Iowa, and Illinois require flexible growing strategies that can adapt to rapidly changing conditions.
Plant petunias after soil has consistently warmed and nighttime temperatures remain above 50°F. In this region, that might vary by several weeks from year to year, so watch weather patterns rather than calendar dates.
The variable weather means your deadheading schedule might fluctuate dramatically. During cool, wet periods, flowers last longer but disease pressure increases. During hot, dry spells, flowers fade quickly but plants may slow their growth. Adjust your maintenance routine accordingly.
Storm damage is a reality in these regions. After severe weather, combine deadheading with gentle cleanup of damaged foliage and stems. This prevents disease issues while encouraging new growth to replace storm damage.
Budget-Smart Petunia Growing: Maximum Beauty for Minimum Investment
Creating stunning petunia displays doesn’t require breaking the bank or compromising your household budget. With smart shopping strategies and proper care techniques, you can achieve professional-looking results for a fraction of the cost of hiring a landscaping service or constantly replacing plants.
Smart Shopping Strategies: When and Where to Buy
Timing your petunia purchases can save substantial money while ensuring you get the healthiest plants. The best deals often come at unexpected times when most gardeners aren’t thinking about buying.
Late spring sales at major retailers like Walmart, Home Depot, and Lowe’s often feature flats of petunias for $2-3 each – less than half the price of individual 4-inch pots. Even if some plants look slightly stressed, healthy petunias recover quickly with proper care and deadheading.
End-of-season clearance sales in late summer offer incredible values on plants that still have months of blooming potential ahead. A $1 clearance petunia in August, properly cared for, will bloom beautifully through October in most regions.
Local garden centers often offer better quality than big box stores, but at higher prices. However, they frequently run midweek specials or offer quantity discounts that make their plants competitive. Building relationships with local garden center staff can alert you to upcoming sales and clearance events.
Seed Starting: Ultimate Budget Gardening
Starting petunias from seed offers the ultimate in budget gardening, though it requires more time and attention than buying transplants. Seeds cost pennies per plant compared to dollars for transplants, and many varieties are only available as seeds.
Start petunia seeds indoors 10-12 weeks before your last frost date. The seeds are tiny and need light to germinate, so barely cover them with vermiculite or fine potting mix. Use recycled containers like yogurt cups or takeout containers with drainage holes punched in the bottom.
Maintain consistent moisture and temperatures around 70-75°F for best germination. A heating mat designed for seed starting can improve germination rates and timing. Once seedlings develop their first true leaves, begin weekly feeding with diluted liquid fertilizer.
The main challenge with seed starting is providing adequate light. A south-facing window works, but supplemental lighting with LED grow lights or fluorescent fixtures produces stronger, more compact seedlings that transition better to outdoor conditions.
Propagation and Division: Free Plants from Existing Stock
While petunias are typically grown as annuals, you can propagate favorite varieties through cuttings, essentially creating free plants from your existing stock. This technique works particularly well with trailing varieties and allows you to preserve special plants over winter.
Take 4-6 inch cuttings from healthy growth tips in late summer, before plants become too stressed from heat or age. Remove lower leaves and dip cuttings in rooting hormone (available for $3-4 at garden centers and lasting for years).
Place cuttings in a mixture of perlite and peat moss or good quality potting mix, keeping them consistently moist but not waterlogged. Provide bright, indirect light and maintain humidity by covering with plastic bags or placing in a makeshift humidity chamber.
Rooted cuttings can be potted up and grown as houseplants through winter, then used as stock plants for more cuttings in spring. This technique allows you to maintain favorite varieties year after year without annual purchases.
Container Gardening Economics: Maximizing Your Investment
Container gardening with petunias offers excellent value when you understand the economics involved. Initial investment in quality containers and potting mix pays dividends for years, while cheap containers and poor soil lead to disappointing results and wasted money.
Invest in containers at least 12 inches wide and deep for single petunia plants, or 18+ inches for multiple plants. Quality plastic or resin containers from retailers like Walmart or Target cost $15-25 but last for decades with proper care. Avoid expensive decorative pots that offer no functional advantage.
Premium potting mixes cost more upfront but provide better drainage, nutrition, and water retention than cheap alternatives. Brands like Miracle-Gro, Black Gold, or Pro-Mix cost $8-12 for large bags but can be stretched by mixing with compost or perlite.
Reuse potting mix for multiple seasons by refreshing it with compost and slow-release fertilizer. This reduces annual costs while maintaining plant health. Store containers with soil intact over winter in unheated garages or sheds to protect the investment.
The Art and Science of Proper Deadheading Technique
Mastering petunia deadheading combines understanding plant biology with developing practical skills that become second nature with practice. The difference between casual flower removal and proper deadheading can mean the difference between mediocre results and spectacular displays that last all season.
Identifying the Perfect Timing: Reading Your Plants’ Signals
Successful deadheading starts with learning to read your petunias like a favorite book. Each flower sends clear signals about its condition and needs, and experienced gardeners develop an almost intuitive sense of timing that maximizes plant response.
Fresh petunia blooms have firm, waxy petals with vibrant colors and clean edges. As flowers age, usually after 3-5 days depending on weather conditions, you’ll notice subtle changes that indicate it’s time to take action. The edges may become slightly papery, colors begin to fade, or the flower starts to lose its crisp appearance.
The key is acting during this transition period, before the flower becomes completely spent. Flowers that are 70-80% faded respond better to deadheading than those that are completely finished. At this stage, the plant hasn’t yet committed full energy to seed development, making your intervention more effective.
Weather plays a crucial role in timing. Hot, sunny days accelerate flower aging, while cool, cloudy conditions extend flower life. During heat waves, you might need to deadhead daily, while during cool spells, every 3-4 days might suffice. Learning to adjust your routine to weather conditions is part of developing expertise.
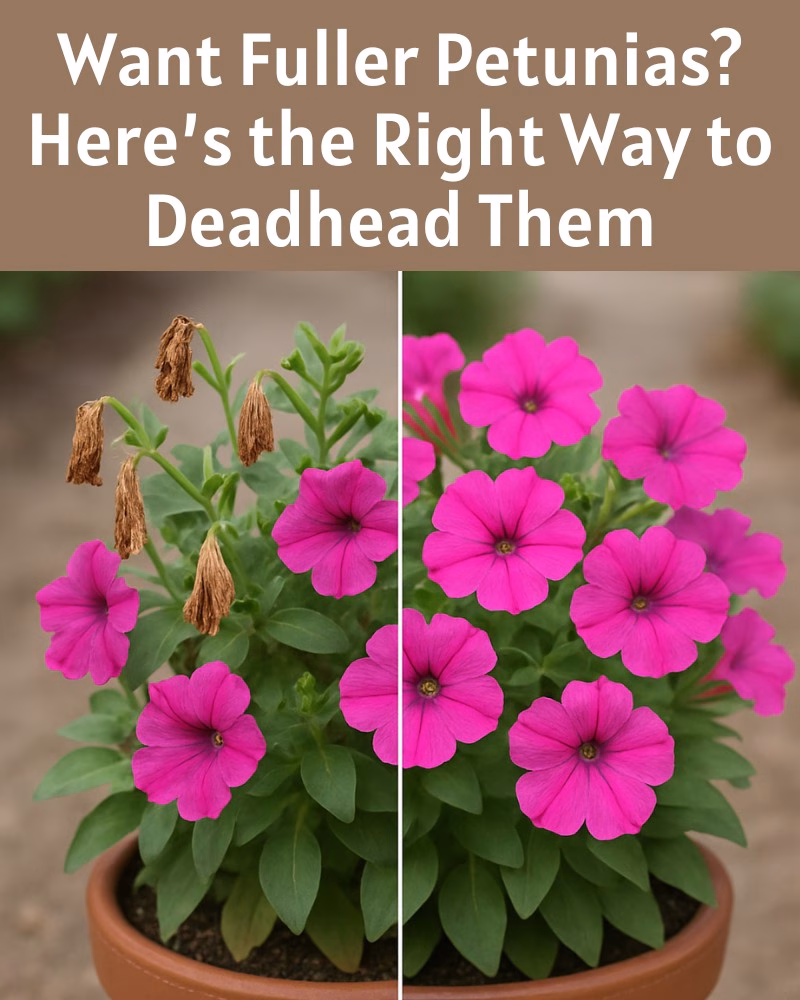
Step-by-Step Deadheading Technique: Getting It Right Every Time
Proper deadheading technique goes far beyond simply pulling off faded petals. The goal is removing the entire reproductive structure while encouraging new growth from the right locations on the plant.
Step 1: Locate the Target Area Follow the flower stem down from the faded bloom to the first set of healthy leaves or side shoot. This junction point is where you want to make your cut. Removing only the flower head leaves behind the developing seed pod, defeating the purpose of deadheading.
Step 2: Choose Your Tool For soft, young stems, clean fingernails work perfectly and give you the most control. For thicker or stickier stems, use small scissors, pruning shears, or even nail clippers. The key is making clean cuts that don’t crush or tear plant tissue.
Step 3: Make the Cut Cut or pinch just above the leaf node or side shoot, angling the cut slightly to shed water. Avoid cutting too close to the main stem, which can damage growing points, or too far away, which leaves unsightly stubs that can harbor disease.
Step 4: Dispose of Debris Remove all cuttings from the container or garden bed. Spent flowers left on soil can harbor fungal diseases or attract pests. Compost healthy plant material or dispose of it in yard waste collection.
Advanced Techniques: Pinching vs. Cutting Back
As your petunias mature through the season, simple deadheading might not be enough to maintain peak performance. Learning when and how to use more aggressive pruning techniques keeps your plants looking fresh and vigorous all season long.
Selective Pinching for Shape Control When individual stems become leggy or start to trail awkwardly, pinch them back to a lower set of leaves or growing point. This encourages branching and creates fuller, more compact growth. Pinching is particularly effective on wave petunias and other spreading varieties.
Mid-Season Cutback for Renewal By midsummer, even well-deadheaded petunias may start looking tired or stretched. A renewal cutback, removing up to one-third of the plant’s height, encourages fresh growth and a second flush of vigorous blooming. Time this cutback after a period of flowering but before extreme heat stress.
Gradual vs. All-at-Once Approaches You can stagger your cutback over several weeks, removing different sections at different times to maintain some blooms while encouraging new growth. Alternatively, cut back the entire plant at once for a dramatic renewal that produces spectacular results in 2-3 weeks.
Troubleshooting Common Petunia Problems: Solutions That Actually Work
Even experienced gardeners encounter challenges with their petunias. Understanding common problems and their solutions helps you maintain beautiful displays while avoiding the frustration of watching your plants decline despite your best efforts.
When Deadheading Isn’t Enough: Diagnosing Underlying Issues
Sometimes, faithful deadheading doesn’t produce the expected results, indicating underlying problems that need attention. Learning to diagnose these issues quickly can save your plants and your gardening season.
Nutrient Deficiency Signs Petunias are heavy feeders, and even with regular deadheading, underfed plants produce fewer, smaller blooms. Pale green or yellowing leaves, especially starting with older foliage, indicate nitrogen deficiency. Purple or reddish leaf tints suggest phosphorus deficiency, while brown leaf edges point to potassium deficiency.
The solution involves regular feeding with balanced fertilizers. Liquid fertilizers like Miracle-Gro or Peters (available at most garden centers for $5-8) applied every 2 weeks provide quick results. Slow-release granular fertilizers like Osmocote offer longer-term nutrition with less frequent application.
Watering Issues: Too Much vs. Too Little Both overwatering and underwatering can cause petunias to stop blooming despite regular deadheading. Overwatered plants develop yellowing leaves, root rot, and poor flowering. Underwatered plants wilt, develop brown leaf edges, and drop buds before they open.
The solution is developing a consistent watering routine based on soil moisture rather than calendar schedules. Stick your finger 1-2 inches into the soil – if it’s dry, water deeply until excess drains from container holes. If it’s still moist, wait another day or two.
Disease Management: Prevention and Treatment
Humid conditions and stressed plants create perfect conditions for fungal diseases that can devastate petunia displays. Early recognition and treatment prevent minor problems from becoming garden disasters.
Gray Mold (Botrytis) This fuzzy gray fungus typically appears on spent flowers and damaged plant parts, especially during cool, wet weather. Prevention is easier than treatment – remove spent flowers promptly and ensure good air circulation around plants.
If gray mold appears, remove affected plant parts immediately and improve air circulation. Fungicidal sprays containing copper or biological controls like Bacillus subtilis can help control spread but work best as preventatives.
Bacterial Leaf Spot Water-soaked spots on leaves that turn brown or black indicate bacterial infections, often caused by overhead watering and poor air circulation. Switch to watering at soil level and space plants for better airflow.
Bacterial problems are difficult to treat with home remedies, but copper-based fungicides can slow spread. Severely affected plants may need replacement to prevent infecting healthy specimens.
Pest Management: Identifying and Controlling Common Problems
Several pests specifically target petunias, and early identification allows for effective control before populations explode and damage becomes severe.
Aphids: The Most Common Culprit These small, soft-bodied insects cluster on new growth and flower buds, sucking plant juices and weakening plants. Heavy infestations cause distorted growth and poor flowering despite adequate deadheading.
Control aphids with strong water sprays that knock them off plants, or use insecticidal soap sprays (available ready-to-use for $4-6 at garden centers). Beneficial insects like ladybugs and lacewings provide natural control when present.
Thrips: Tiny but Destructive These microscopic pests cause silvery streaking on leaves and can transmit viral diseases. They’re particularly problematic in hot, dry conditions and can quickly spread through container displays.
Blue sticky traps help monitor and reduce thrip populations. Predatory mites provide biological control, or systemic insecticides may be necessary for severe infestations.
Seasonal Care Calendar: Your Year-Round Action Plan
Successful petunia growing involves understanding the seasonal rhythms that affect plant performance and adjusting your care routine accordingly. This calendar approach helps you anticipate needs and time activities for maximum effectiveness.
Spring Preparation: Setting the Stage for Success (March-May)
Spring preparation determines whether your petunias will thrive or merely survive through the growing season. The time invested in proper preparation pays dividends in reduced maintenance and better performance all season long.
Soil and Container Preparation Refresh potting mix in existing containers by removing the top 2-3 inches of old soil and replacing it with fresh potting mix enriched with compost. This provides renewed nutrition while maintaining good drainage.
For new plantings, choose containers at least 12 inches wide and deep with drainage holes. Mix premium potting soil with compost or aged manure in a 3:1 ratio for optimal nutrition and water retention.
Plant Selection and Purchasing Visit garden centers during weekday mornings for the best selection and healthiest plants. Look for compact, bushy plants with dark green foliage and plenty of buds. Avoid plants that are already flowering heavily – they may be pot-bound and struggle with transplant shock.
Consider purchasing a mix of varieties for extended interest. Combine upright types for height with trailing varieties for spillover effects. Include both early and late-season varieties to extend blooming periods.
Initial Planting and Setup Plant after soil temperatures consistently reach 60°F and nighttime temperatures stay above 50°F. In most regions, this occurs 2-3 weeks after the last frost date.
Space plants according to mature size – typically 6-12 inches apart depending on variety. Crowded plants develop more disease problems and require more frequent deadheading due to increased competition.
Summer Maintenance: Peak Performance Period (June-August)
Summer is when your deadheading skills really matter. Plants are growing vigorously, flowering heavily, and facing their greatest environmental stresses. Consistent care during this period determines whether your displays remain spectacular or decline into mediocrity.
Daily and Weekly Routines Incorporate deadheading into your morning garden routine, preferably before 10 AM when temperatures are cooler and plants are less stressed. This timing also allows you to remove dew-dampened spent flowers before they can develop fungal problems.
Check soil moisture daily during hot weather, watering deeply when the top inch feels dry. Container plants may need daily watering during heat waves, while garden plants typically need water every 2-3 days.
Mid-Season Renewal Strategies Plan for a mid-July renewal cutback when plants start looking stretched or tired. Remove up to one-third of plant height, cutting just above leaf nodes or growing points to encourage branching.
Increase fertilizer frequency during peak growing periods, switching to weekly applications of liquid fertilizer during July and August when plants are working hardest.
Fall Transition: Extending the Season (September-November)
Fall offers opportunities to extend your petunia season well into autumn with proper care and variety selection. This period requires different strategies than summer growing, focusing on maintaining plant health as temperatures moderate.
Adjusting Care Routines Reduce watering frequency as temperatures drop and plant growth slows. Continue deadheading but expect longer intervals between sessions as flowers last longer in cooler weather.
Gradually reduce fertilizer applications, switching to monthly feeding to avoid encouraging tender growth that’s susceptible to early frost damage.
Season Extension Techniques Move containers to protected locations during cold snaps to extend blooming into late fall. South-facing walls or covered patios provide several degrees of frost protection.
Select late-season varieties known for cool-weather tolerance. Some petunia varieties actually prefer fall conditions and produce their best displays as summer heat subsides.
Companion Planting and Design Ideas: Creating Stunning Combinations
Petunias shine brightest when paired with complementary plants that enhance their beauty while providing practical benefits. Understanding effective combinations helps you create displays that look professionally designed while maximizing the impact of your deadheading efforts.
Classic American Combinations That Never Fail
Some plant combinations have proven themselves in American gardens for generations, offering reliable beauty with minimal fuss. These tried-and-true partnerships make design decisions easier while ensuring success.
The Patriotic Trilogy: Red, White, and Blue Combine red petunias with white sweet alyssum and blue lobelia for classic Americana appeal that’s perfect for Memorial Day through July 4th and beyond. This combination works in containers, hanging baskets, or garden beds, providing continuous color with complementary care requirements.
The key to success is choosing varieties with similar growth habits and water needs. Compact petunia varieties work best with low-growing alyssum and trailing lobelia. All three plants benefit from regular deadheading, making maintenance efficient.
The Victorian Cottage Garden Mix Pair soft pink or lavender petunias with silver dusty miller and purple verbena for an elegant, old-fashioned look that evokes English cottage gardens. This sophisticated combination works particularly well in formal containers or as border plantings.
Dusty miller provides textural contrast and doesn’t require deadheading, while verbena benefits from the same deadheading routine as petunias. The silver foliage brightens the entire display and helps softer flower colors show up better.
Modern Container Combinations for Contemporary Appeal
Today’s gardening trends favor bold colors, interesting textures, and low-maintenance combinations that deliver maximum impact with minimal effort. These contemporary approaches reflect current design sensibilities while remaining practical for busy lifestyles.
The Tropical Fusion Combine bright orange or coral petunias with coleus, sweet potato vine, and caladiums for a bold, tropical-inspired display that thrives in summer heat. This combination works especially well in large containers or window boxes.
The varied foliage textures and colors create interest even when flowers are being deadheaded, and the heat-loving plants actually improve as summer progresses. Sweet potato vine requires occasional pinching to control growth, complementing your petunia deadheading routine.
The Monochromatic Masterpiece Use different shades of the same color family – various purples, pinks, or yellows – combined with plants of different heights and textures. This sophisticated approach creates depth and interest without color chaos.
Purple petunias paired with purple fountain grass, lavender, and silver heuchera create a stunning monochromatic display that’s both contemporary and timeless. The varied textures and plant heights create visual interest while simplifying color coordination.
Seasonal Succession Planting Strategies
Planning for seasonal changes allows you to maintain beautiful displays throughout the growing season while maximizing your investment in containers and soil preparation.
Spring-to-Summer Transitions Start containers with cool-weather annuals like pansies or primrose, then replace them with petunias as temperatures warm. This approach provides early season color while ensuring optimal conditions for summer performers.
Plant petunias among spring bulbs for automatic seasonal succession – as tulips and daffodils fade, petunias are ready to take over the display. The bulb foliage helps hide developing petunia plants during the transition period.
Summer-to-Fall Extensions Plan for fall color by incorporating plants like ornamental kale, mums, or asters that can be added to existing containers as petunias wind down. This extends container life and value while maintaining seasonal interest.
Consider cold-hardy petunia varieties that actually improve in fall weather, paired with plants like ornamental peppers or fall-blooming perennials for extended season interest.
Advanced Tips from Experienced Gardeners: Professional Secrets Revealed
After years of growing petunias and talking with fellow gardeners, I’ve discovered techniques that separate the truly spectacular displays from merely good ones. These professional-level tips can elevate your gardening game while actually reducing the time and effort required for maintenance.
The Commercial Grower’s Approach to Deadheading
Commercial greenhouse operations that produce thousands of petunia containers have refined deadheading techniques for maximum efficiency and results. Adapting their methods to home gardens can dramatically improve your success rate.
The Assembly Line Method Instead of randomly deadheading as you notice spent flowers, establish a systematic routine that covers all plants efficiently. Start at one end of your display and work methodically to the other end, addressing each plant completely before moving on.
This approach ensures no plants are overlooked and helps you notice developing problems before they become serious. It also makes the task feel more manageable and less overwhelming when dealing with multiple containers or large plantings.
The Two-Pass System Make two passes through your plants – first removing obviously spent flowers, then returning for more careful evaluation of borderline cases. This prevents over-deadheading while ensuring you catch flowers at the optimal removal stage.
The first pass handles the obvious maintenance while the second pass allows for more nuanced decisions about timing and technique. This approach works particularly well when you’re still developing confidence in recognizing optimal deadheading timing.
Water and Nutrition Timing That Maximizes Deadheading Results
The timing of watering and fertilizing in relation to deadheading can significantly impact plant response and overall performance. Understanding these relationships helps you get maximum benefit from your maintenance efforts.
Post-Deadheading Nutrition Boost Apply liquid fertilizer within 24 hours after major deadheading sessions to provide immediate nutrition for new growth. This timing takes advantage of the plant’s natural response to pruning and encourages rapid development of new buds.
Use a balanced liquid fertilizer diluted to half strength to avoid burning newly exposed plant tissues. The combination of deadheading and immediate nutrition often produces visible new growth within days rather than weeks.
Strategic Watering for Optimal Response Water thoroughly before deadheading sessions to ensure plants are fully hydrated and less likely to experience stress from the pruning process. Well-hydrated plants recover more quickly and respond more vigorously to deadheading.
Avoid watering immediately after deadheading if possible, allowing cut surfaces to begin healing before introducing additional moisture that might encourage fungal problems. Wait 4-6 hours after deadheading before watering unless plants show obvious stress signs.
The Psychology of Plant Care: Understanding Motivation and Consistency
Successful gardening involves as much psychology as plant science. Understanding what motivates consistent care helps you maintain the regular routines that make deadheading effective rather than sporadic efforts that produce mediocre results.
Creating Sustainable Routines Link deadheading to existing daily routines – morning coffee, evening walks, or weekend relaxation time. This connection makes the task feel like part of your lifestyle rather than an additional chore competing for time and attention.
Many successful gardeners report that deadheading becomes a meditative activity that provides stress relief and connection with nature. Approaching it with this mindset transforms the task from work into self-care time.
Tracking Progress and Celebrating Success Keep a simple garden journal or take weekly photos to document your plants’ response to deadheading. Seeing the dramatic improvements that result from your efforts provides motivation to continue consistent care routines.
Share your success with friends, neighbors, or online gardening communities. Recognition and positive feedback reinforce good habits while connecting you with other passionate gardeners who can provide additional tips and encouragement.
Cost-Effective Fertilizing Strategies: Feeding Your Petunias on a Budget
Proper nutrition is essential for plants that are being regularly deadheaded, as they’re working harder than normal to produce continuous blooms. However, feeding your petunias doesn’t require expensive specialty fertilizers or complicated schedules.
Budget-Friendly Fertilizer Options That Actually Work
Liquid Fertilizers: The Most Bang for Your Buck Concentrated liquid fertilizers like Miracle-Gro or Peters offer excellent value when you calculate cost per application. A $8 container provides dozens of applications when mixed according to directions, making it much more economical than ready-to-use formulations.
Mix liquid fertilizers at half the recommended strength and apply twice as often for better results with less risk of burning. This approach provides more consistent nutrition while using the same amount of product over time.
Slow-Release Granular Options Products like Osmocote or Dynamite provide 3-6 months of nutrition with a single application, making them ideal for busy gardeners or those who travel frequently. While the upfront cost is higher, the per-month cost is often lower than liquid fertilizers.
Apply slow-release fertilizers at planting time, working them into the top few inches of potting mix. The granules release nutrients gradually as you water, providing consistent nutrition that supports vigorous growth and continuous blooming.
Homemade and Organic Alternatives
Compost Tea: Free Nutrition from Kitchen Scraps Compost tea provides gentle, organic nutrition that won’t burn plants even with frequent application. Make your own by steeping finished compost in water for 24-48 hours, then straining and applying the liquid to plants.
Add liquid kelp or fish emulsion (available at garden centers for $5-8) to compost tea for extra nutrition. This combination provides a broad spectrum of nutrients while remaining gentle enough for weekly application.
Coffee Grounds and Eggshells: Recycling Kitchen Waste Used coffee grounds provide nitrogen and improve soil structure when mixed into potting soil or applied as mulch. However, use them sparingly – too much can make soil acidic and compact.
Crushed eggshells provide calcium and help prevent blossom end rot in tomatoes grown near your petunias. Rinse shells clean, dry thoroughly, and crush before